Wednesday, April 27, 2011

Guest Post: Laura's Rainbow Cake

I am so excited to introduce you to Laura!  Isn't she gorgeous?  I met Laura when we lived in Kentucky.  To know Laura is to love Laura.  She's one of those people who makes you feel like a million bucks because she is so genuine, kind, and all sorts of fabulous.  Plus, she is super talented.  You've got to check out this cake she made.  Here she is...


My name is Laura, and I am flattered and excited that Kim invited me to be a guest on her blog! I'm a stay at home mom to two small kiddos--an adorable and very busy 21 month old son named Dominic, and a beautiful, sweet daughter named Bethany, who just turned 4. This birthday cake was for her special day. The last several months, she has been obsessed with rainbows. She loves to watch the show on PBS called, "The Cat in the Hat Knows a lot about that!" and they have an episode all about rainbows with a cute little song listing all 7 colors. So, this year for her birthday, it was all about rainbows! We had rainbow streamers, balloons that were all of the colors of the rainbow, rainbow colored fruit (watermelon, cantaloupe, pineapple, green grapes, blueberries, and purple grapes), and she even wore a rainbow dress for her birthday party. A bit over the top? Nah! She loved everything about it, and it sure was fun! What was my favorite rainbow thing? The cake of course! I absolutely love making fun and sometimes time consuming cakes for my kids' birthdays. Seeing their reaction to the final product is the best! For the rainbow theme, I found several websites who had ideas on how to bake a rainbow cake, but the blog "One Charming Party" had an idea I liked best.


Here's how I did it:

8 Layer Rainbow Cake:

What you will need:
2 boxes of your favorite brand of white cake
8 colors of food coloring (I use the Wilton brand icing colors. In my opinion, they are the truest & brightest colors)
8 bowls
8" or 9" round pan(s)

Preheat the oven to 350. Mix the two cake mixes according to the directions on the box. Divide the batter into 8 different bowls. I used an overflowing 2/3 cup for each color to make them evenly divided. Add the food coloring to each bowl. With the Wilton icing colors, I used Red-Red, Orange, Lemon Yellow, Leaf green, Royal Blue, Delphinium Blue (this made a great indigo), Violet, and Pink. Grease and flour your pan(s) and line the bottom with wax paper to ensure they will come out of the pan after baking. You will obviously take turns with your pans--unless you happen to have 8 pans! Cook each cake at 350 for about 15 minutes or until a toothpick poked in the center comes out clean.  Once the cakes are cooled completely, individually wrap each color and freeze them. This will make it easier to assemble and frost each layer. Once they are all frozen, you can begin to assemble your cake, frosting each individual layer, and then frost the whole cake when all the layers have been frosted and stacked. This makes a fabulously tall cake, but the really fabulous part is when you cut into it! All of the kids at the party were so surprised by the rainbow colors inside of the cake!

The birthday girl with her rainbow cake.

Sunday, April 24, 2011

BBQ Chicken Salad with Creamy BBQ Cilantro Lime Dressing


Talk about a PARTY in my "boca". This BBQ chicken salad with the incredible dressing was an explosively great combination of flavors in my mouth.  I adore this salad!  It has definitely become a favorite of mine.  The dressing seriously makes the salad....absolutely IRRESISTIBLE!

BBQ Chicken Salad
Ingredients:
3 cups cooked, shredded chicken
2 cups BBQ sauce
½ head iceberg lettuce, cored and chopped
2 romaine hearts, chopped
1/2 red onion diced
¼ cup chopped fresh cilantro
1 1/2 cups frozen corn, thawed
1 can (15 ounces) black beans, rinsed and drained
4 ounces sharp cheddar cheese, cubed small or shredded
4 ounces Monterey Jack cheese, cubed small or shredded

Directions:
1.  Combine the cooked chicken and BBQ sauce in a medium bowl. Refrigerate until ready to use.

2.  In a large bowl, toss together the iceberg lettuce, romaine lettuce, red onion, cilantro, corn, black beans and cheese. Toss the mixed salad with about 1/4 to 1/2 cup of the dressing, if desired. Otherwise, you can serve the dressing on the side. Place salad on plates and top with the prepared BBQ chicken and additional dressing.

Creamy BBQ Cilantro Lime Dressing
Ingredients:
1 cup mayonnaise, light or regular
1/3 cup milk
1/3 cup buttermilk
2 tablespoons fresh cilantro, finely chopped
1 tablespoon lime juice
1 teaspoon white vinegar
1 teaspoon granulated sugar
1 garlic clove, finely minced
1/2 teaspoon salt
1/8 teaspoon cayenne pepper
1/8 teaspoon black pepper
1/4 teaspoon ground cumin
1/4 to 1/2 cup BBQ sauce

Directions:
Combine all the ingredients together and whisk (or shake, if using a jar) vigorously to combine. You could also run this through a blender to make it even more smooth. Refrigerate until ready to serve.

Recipe Source:  Mel's Kitchen Cafe

Linked to:  Tuesday Night Supper Club

Sunday, April 17, 2011

Sweet Pull-Apart Rolls


A delectable, sweet, sticky pull-apart bun that's perfect for Easter morning or any special breakfast occasion.  What I love about these yummy morsels is that they are easy and there's only five ingredients!  You can make 'em the night before and then cook 'em up in the morning - perfect to give you a morning sugar rush to jump start your day!  There is butterscotch pudding in the recipe, but trust me, it doesn't taste like butterscotch.  The butterscotch pudding just makes it taste like a buttery melt-in-your mouth piece of culinary heaven. 

Sweet Pull-Apart Rolls

Ingredients:
24 frozen Rhodes rolls
1/2 c. butter
1/2 c. brown sugar
1 pkg. cook and serve butterscotch pudding
1 tsp. cinnamon

Directions:
Place the frozen rolls in a greased bundt pan. Sprinkle the rolls with the pudding powder and cinnamon. Melt the butter and brown sugar together (I used the microwave.); pour over the rolls. Place a damp towel over the pan and let sit for 6-8 hours until it rises. (I let mine rise for 10 hours overnight.)  Bake at 350 degrees for 30-35 minutes or until golden brown on top. Let cool for a 5-10 minutes then place the pan upside down on a plate and let the yummy gooey stuff fall all over the rolls.  Use a spatula and smother the yummy gooey goodness all over until every single roll is covered in it.

Recipe Source:  My SIL Elisabeth Merrill

Linked to:  Potluck Sunday, Tuesday Night Supper Club, Full Plate Thursday, Sweets for a Saturday

Tuesday, April 12, 2011

Layered Brownie Ice Cream Cake


Ice cream and brownies and cream!  Oh my!!!  This was the hubs birthday cake this year and I must say, it was a winner.  We DEVOURED that baby.  My hubs requested 3 of his favorites things to be in this cake:  brownies, oreos, and ice cream.  This is what we came up with:  An Oreo cookie crumb bottom, a smooth cookies and cream ice cream layer, the ultimate brownie layer, topped by decadent Tillamook Mudslide Ice Cream, with Cool Whip and Oreo to finish her off.  I think it is one of our all time favorite cakes now.  Too bad my birthday isn't 'til November....guess we'll just have to find another reason to make this cake soon.  So the cake is very simple to prepare.  Just takes a little planning with time because you have to do a few things ahead of time and freeze the cake before serving so check out the timing. 

Layered Brownie Ice Cream Cake

Ingredients:
15 Oreo cookies
1-2 tablespoons milk
8-9 ice cream sandwiches
1 pint chocolate ice cream (I used chocolate with a chocolate fudge swirl - Tillamook Mudslide.)
1 pint cookies and cream ice cream
1 brownie mix (plus ingredients to make the brownies)
1 container (8 ounces) Cool Whip

Directions:
1.  Make brownies according to directions on box. Prepare two 8-inch cake pans by putting wax paper in it and spraying it with cooking spray. Pour half the brownie mix into each of the pans. Cook for 25 minutes or until toothpick comes out clean at the degree specified on the brownie mix box. Cool. Cover with plastic wrap and let set overnight or at least a few hours. You only need one pan of the brownies so feel free to eat the other pan while you're making the ice cream cake. ; )
2.  Coat bottom and side of a 9-inch round springform pan with nonstick cooking spray. Line side with waxed paper, using spray to help adhere to pan. Trim paper to height of pan.

3. Finely crush 12 of the Oreos in a food processor. Add milk; pulse just until mixture holds together. Set aside.

4.  Unwrap the ice cream sandwiches.  Cut the ice cream sandwiches in half lengthwise.  Then cut sandwiches in half crosswise (these will be the cake's edge).  Working quickly, stack cut strips on end against side of prepared pan to form the stand up edge of the cake. Spoon cookie crumbs into center of pan; press firmly over bottom. Freeze 1 hour.  Click here for a tutorial with pictures on how to do step 4. 

5.  Remove the ice cream from freezer; let soften for 15 minutes at room temperature. Remove the springform pan with the edges and crumb bottom. Transfer the cookies and cream ice cream into the pan and press down ice cream until level and smooth. For the brownie layer, cut off some of the edge to make it fit into the center of the cake.  When it fits in, fill in any holes with the extra edge pieces.  Press down on any brownie pieces that aren't smooth and even. Next, place the chocolate ice cream on top of the brownie layer and press down until smooth and level. Add thawed Cool Whip, swirling decoratively. Break up remaining 3 sandwich cookies and use to decorate cake. Return to freezer; freeze overnight or at least 5 hours).

6.  To serve, remove side of pan, then waxed paper. Let cake stand at room temperature for 5-10 minutes for easier cutting. Slice into wedges and serve.

Inspired by:  Layered Ice Cream Cake

Linked to: Tuesday Night Supper Club, What's Cooking Wednesday, Show and Tell at Blue Cricket Design, Your Whims Wednesday, Friday Favorites, Sweet Tooth Friday, Sweets for a Saturday, Foodie Friday

Thursday, April 7, 2011

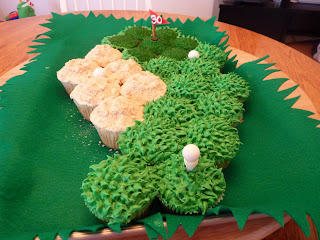
Tee Time Cupcakes


Do you want to impress without too much fuss?  This is definitely the cake or rather cupcakes for that.  This cake is pretty simple and is perfect for the Masters golf tournament coming up this Sunday.  I actually made this as a surprise for the hubs celebrating his 30th birthday and brought it to school for him and his co-residents.  (He wants this ice cream cake for his actual birthday, but I had to surprise him with SOMETHING for his 30th.)  There are five things you need to know about this:  1.  You don't need any cake decorating tips, just ziplock bags.  2.  You don't need to have any cake decorating skills.  Seriously!  3.  The biggest booger on this cake was sticking the white non-pareils on the gumballs.  I didn't even bother sticking the white-nonpareils to the gumball on the tee.  I just left it plain.  So if you don't want to bother with it, just skip that part of the directions in step four (and don't buy the white non-pareils).  5.  People will ooh and aah and think you are amazing.... : )  Just don't let them in on the secret of how easy it is. 

Tee Time Cupcakes

What you need:
24 vanilla cupcakes, 6 baked in white paper liners and 18 baked in green paper liners
1/2 cup ground vanilla wafers
2 cans (16 ounces each) vanilla frosting
Green food coloring
1/2 cup green decorating sugar or 1 (2.25 oz.) bottle of the green decorating sugar
1 yellow flat candy (Smarties or generic)
1 yellow licorice pastel (I used a white Good & Plenty.)
1 tablespoon white nonpareils
3 white gum balls
1 teaspoon light corn syrup
1 2-inch piece strawberry fruit leather (Fruit Roll-ups or Fruit by the Foot works best.)
1 thin pretzel stick
1 chocolate chip
Green felt (if you want to place the cupcakes on a green surface)

Directions:
1.  Place the cookie crumbs in a shallow bowl.  Spread the tops of the 6 cupcakes in white paper liners with vanilla frosting and smooth.  Roll the tops in the crumbs to cover.  Spoon 2 tablespoons vanilla frosting into a small ziplock bag, press out the excess air, and seal.  (You'll use this later.)  Tint the remaining frosting green with the food coloring. 

2.  Place the green decorating sugar in a small shallow bowl.  Spread the tops of 7 of the remaining cupcakes with green frosting and smooth.  Roll the tops in the sugar to cover.  Spread a thin layer of green frosting over the remaining 11 cupcakes.  Spoon the remaining green frosting into two ziplock bags, press out the excess air, and seal. 

3.  Arrange the cupcakes on a serving platter, grouping the crumb-topped cupcakes and the sugar-topped cupcakes together.  (See photo below.)  My cupcakes fit perfectly in an 11x14 inch cookie sheet that was covered with green felt. 


Add some extra wafer crumbs to the top of the sand trap cupcakes to make it look more sandy.  Snip a small (1/8-inch) corner from the bags with green frosting.  Pipe grass over the green-frosted cupcakes and around the perimeter of the sugar-topped cupcakes.  To create the grass, touch the tip of the bag to the surface, squeeze, and anchor the frosting.  Release the pressure before lifting.  Pull away to make a peak.  Don't worry if a few pieces of grass don't turn out.  At the end, you'll never notice. 

4.  For the tee, snip a small (1/8-inch) corner from the bag with the vanilla frosting and pipe a dot on one end of the yellow flat candy.  Attach the licorice pastel and insert into 1 of the cupcakes at the tee position.  Place the white nonpareils in a small shallow bowl.  Roll the gum balls in the corn syrup to coat and then roll them in the nonpareils to coat.  Pipe a dot of frosting on top of the tee and place 1 ball on top.  Place the others on other cupcakes. 

(I hope this pic gives you a better view of the tee.)

5.  For the flag, fold the fruit leather in half around one end of the pretzel stick.  Using clean scissors, cut into a triangular flag shape.  Pipe the number you want on the flag with the vanilla frosting.  Insert the pretzel stick in the center of the sugar-topped cupcake grouping.  For the hole, add the chocolate chip at the base of the pretzel, pointed end down. 

Recipe Source:  What's New, Cupcake? by Karen Tack and Alan Richardson

Linked to:  Full Plate Thursday, Tuesday's Tasty Tidbits, Sweet Tooth Friday, Saturday Swap, Sweets for a Saturday

Sunday, April 3, 2011

BBQ Chicken Enchiladas


I am a total sucker for all things with BBQ in the title. This recipe had me from those 3 blessed letters.  Then you add chicken...and enchiladas???  Yep, I'm sold.  Well, do I even need to proceed and tell you how I much we enjoyed these?  They were fabulous and a good change from all our standard enchiladas we make around here.  I thought the addition of the BBQ sauce to the red enchilada sauce made the sauce way, WAY better than it is alone.  Made it...loved it...blogged it!

Quick Enchilada Sauce

When I decided to make this for dinner on a whim, I was so glad this recipe included a homemade enchilada sauce to go with it so I didn't have to run to the store to buy anything. 

Ingredients:
1/2 cup vegetable oil
4 tablespoons flour
3 tablespoons chili powder
1 16 oz. can tomato sauce
2 cups water or chicken broth
1 teaspoon ground cumin (I love cumin!  Anyone else feel the love?)
3-4 cloves garlic, freshly pressed
1 teaspoon onion powder or flakes
salt to taste

Directions:
1.  Heat the oil in a skillet over medium-high heat.  Reduce heat to medium and stir in the flour and chili powder. Cook until lightly browned, stirring constantly to prevent burning. 
2.  Gradually add the rest of the ingredients, continuing to stir to prevent the sauce from sticking and burning.  Cook for approximately 10 minutes, or until sauce begins to thicken. 

BBQ Chicken Enchiladas

Ingredients:
Enchilada Sauce, above (or a 28-ounce can of commercial sauce)
1/2 cup BBQ sauce
2 cans (14 ounces each) of shredded chicken or 1.5 pounds of boneless chicken, cooked and shredded
1 medium sweet onion, chopped
1 tablespoon BBQ seasoning
1/8 teaspoon cayenne pepper (more or less to taste)
6 ounces of shredded cheese (I used cheddar, but feel free to mix it up a bit.)
10 tortillas

Directions:
1.  Preheat the oven to 375.
2.  Whisk the BBQ sauce into the enchilada sauce you just prepared or in a bowl with the canned sauce. 
3.  In a large skillet, saute the onion for 7 to 10 minutes or until it is soft.  Add the shredded chicken and spices to the onion.  Mix well.  Add 1/2 of the enchilada sauce and 1/2 of the shredded cheese to the chicken mixture and stir. 
4.  Coat the bottom of a 9x13 inch baking dish with some enchilada sauce. 
5.  Fill each tortilla with about 1/3 cup of chicken mixture, roll it up, and place it seam side down in the baking dish.  Pour the remaining enchilada sauce over the rolled up enchiladas, and top with the rest of the cheese. 
6.  Bake at 375 for 25 minutes or until the cheese and sauce are bubbly. 


Friday, April 1, 2011

Low Fat Chewy Chocolate Chip Oatmeal Cookies


We just got home from staying in a beach house on the Oregon coast with some good friends.  It was so much fun.  We especially loved sitting in a hot tub and overlooking the beach.  Nice!  We hadn't seen our friends for about 7 months so of course we had to stay up at nights getting our game on.  So as we played games, what else did we do?  We ate cookies...lots and lots of cookies.  So when we got home, I told myself, "No more cookies."  Like I'm a naughty little kid sneaking into the cookie jar, right?  So the first day we are home what do I find myself doing?  Sneaking into the kitchen to make...you guessed it...MORE COOKIES!!!

So I justified myself in making these cookies because they are low fat.  Let me tell you...most low fat cookies are not that great to me.  If I want a cookie, I want the Fatty Daddy style.  But these little morsels are fabulous.  They taste great and have a wonderful texture.  We are really enjoying these.  Definitely some of my favorites, and I don't feel guilty eating more than 1...

Low Fat Chewy Chocolate Chip Oatmeal Cookies

Ingredients:
1 cup all purpose flour
1 tsp. baking powder
1/2 tsp. baking soda
1/2 tsp. salt
1/2 tsp. ground cinnamon
2 tbsp. unsalted butter, room temperature
1/2 cup sugar
1/2 cup unpacked brown sugar
1 large egg
1/4 cup unsweetened apple sauce
1/2 tsp. vanilla extract
2 cups quick oats
3/4 cup dark chocolate chips

Directions:
Preheat oven to 350.  In a medium bowl, whisk together flour, baking powder, baking soda, salt, and cinnamon.  In a large bowl, with a mixer, cream together the butter and the sugars on medium speed.  Add the egg, followed by the applesauce and vanilla extract.  Stir in the flour mixture and the oats until just combined.  Stir in the chocolate chips.  Drop heaping tablespoons of the dough onto baking sheets that are lined with parchment paper.  Bake for about 10-12 minutes, or until cookies become light brown at the edges.  Let cool on baking sheet for 3-4 minutes, then transfer to a wire rack to cool completely eating a few as your transfer.  :)  (Don't overcook.)

Makes about 30 cookies (roughly 3 Tbls. each).

Serving size: 2 cookies  Calories: 190  Fat: 6.3 g  Protein: 2.6 g  Carb: 34.2 g  Fiber 2.0 g  Sugar 19.3 g

Recipe Source:  Gina's Skinny Recipes

LinkWithin

Related Posts with Thumbnails