Showing posts with label cake. Show all posts

Tuesday, April 15, 2014

Construction Birthday Cake

Well Howdy y'all!  With two birthdays in the family last week, it has been a little crazy busy around the casa!  I realized I needed to create a birthday cake and fast for my little 4 year old.  He loves cars, airplanes, trucks, cranes, tractors, pretty much anything that moves!  I found some ideas online to get the brain started and then created this.  It was fast, simple, and easy, and he loved it!!! 

 
I made it the night before his birthday, and he couldn't stop staring at it.  He was begging to play with it!
 
 
Look at that little guy!  He makes me laugh every day!  After we sang and blew out candles, he got his wish...to go crazy with the cake!


I guess they all went a little crazy with the cake!  They had so much fun with it, and that to me was really worth it.  And I will be honest...I couldn't stop eating it.  Something about the crunch the little rock candies added to the moist cake was just like a mini birthday party in my mouth.  And I gotta be honest, if there is food in front of my face, there is a 90 % chance I will eat it. 


The aftermath in the construction zone!  
 
Construction Birthday Cake
 
Chocolate Cake
Ingredients:
1 box chocolate cake mix
1 small box of instant chocolate pudding
1 cup sour cream
3/4 cup water
3/4 cup oil
4 eggs
 
Directions: 
Mix all ingredients together until well blended.  Pour into two 8- or 9-inch cake pans.  Bake according to the directions on the cake box.  Be sure to check with a toothpick to ensure that the cake is cooked through.  Cool cakes.  When cool, wrap in plastic wrap and freeze.
 
Chocolate Buttercream Frosting
Ingredients:
1 lb. powdered sugar
1/3 cup cocoa powder
1/2 cup (1 cube) butter
1 teaspoon vanilla
1/4 cup milk (adjust to get the right consistency)
 
Directions: 
Mix all ingredients until light and fluffy. 
 
Frosting the Cake:
Unwrap the frozen cakes from the plastic wrap.  Put a layer of frosting on top of one of the cakes, then stack the other cake on top.  Frost the entire cake.  This cake is so forgiving, just spread away!  After frosting, take a chunk out of the top layer of the cake.  Put that below the area it was removed as dirt.  Then use Oreo crumbs to create additional piles of dirt on and around the cake.  Put piles of  Chocolate Rock Candy around the bottom of the cake and a single layer around the top of the cake for a border.  Place any type of construction trucks around the cake.  (I bought a 5 pack at Wal-Mart for $4.99.)  And you're done!!!


Tuesday, November 8, 2011

Pumpkin Cream Trifle


This Pumpkin Cream Trifle is a perfect dessert for Thanksgiving or for any type of gathering in pumpkin season.  I just made this for a large party, and it was a huge hit.  You just can't beat layers of soft and flavorful pumpkin spice cake layered together with smooth whipped cream and cheesecake pudding, all topped by a delightful crunchy toasted nut and toffee layer.  This dessert really is delicious!  Plus, it is so simple to make.  You can really whip it together once the cake is done and cooled. 

Pumpkin Cream Trifle

 First Layer:
1 pkg spice cake mix
1 pkg. (3.4 oz) instant vanilla pudding
1 cup canned pumpkin
½ cup vegtable oil (can do ¼ cup applesauce, and ¼ cup oil instead)
½ cup water
3 large eggs
1 tsp ground cinnamon
½ tsp ground ginger

 Preheat oven to 350. Spray 9x13 baking pan with vegtable oil spray. Place all cake ingredients in large mixing bowl. Blend with electric mixer on low speed from 1 minute. Scrape down sides and then increase speed to medium and beat for 2 minutes more. Batter should look thick and well blended. Pour into prepared pan and bake 32-39 minutes or until cake tests done. Cool completely. (cake can be frozen at this point. Thaw at room temperature before assembling trifle.) When ready to prepare trifle, cut or tear into approx. 1 inch cubes.

 Second Layer (cream):
2 pkgs. (3.4 oz) cheesecake flavored instant pudding mix
2 cups cold milk
2 cups freshly whipped cream (unsweetened)

 Combine pudding mixes with milk and blend with whisk until it starts to thicken. Fold in whipped cream, then quickly assemble trifle.

 Third Layer (toppings):
½ cup chopped, toasted pecans or almonds
½ cup Skor toffee bits

 To assemble trifle:

Place 1/3 of cake cubes into trifle bowl. Top with 1/3 of cream mixture and sprinkle with 1/3 of nuts and toffee bits. Repeat layers two more times, ending with nuts and toffee on top. Serve immediately or refrigerate, covered no longer that 24 hours.

Thursday, September 1, 2011

Oreo Cupcakes


What could be better than Oreo infused cupcakes? We absolutely love these cupcakes.  These cupcakes are the favorites of my hubs and the little lady of the house.  They may even be the favorite of the little man, but he can't tell me so yet.  This is a delectable cupcake.  It has half an Oreo on the bottom, Oreo in the batter, and a little bit of Oreo in the frosting.  It is pure goodness.  You can also make these into little sweet babies.  I have a fetish for little things, so I love these mini Oreos cupcakes.  Just be sure to buy a bag of the mini Oreos for the garnish and to put on the bottom of the cupcake. 


Oreo Cupcakes

Ingredients:
1 package chocolate cake mix
1 cup sour cream
3/4 cup water
3/4 cup oil
4 eggs
1 small package chocolate pudding
44 Oreos, divided (16 Oreos coarsely chopped, 14 Oreo halves, 14 Oreo halves for garnish)

Directions:
1. Preheat oven to 350 degrees F. Place cake mix, pudding mix, eggs, water, oil and sour cream into a stand or electric mixer. Beat on medium speed for close to 2 minutes or until well combined. Coarsely chop 16 oreos.  Gently fold the Oreos into the cake batter.

2. Line the cupcake pans with paper liners. At the bottom of each liner, place half of an Oreo. Then fill with batter until the liner is 1/2-3/4 full. Bake for 18-24 minutes or until toothpick comes out mostly clean from center. Let cool completely. (This recipe makes about 28 cupcakes.)
 
Frosting

Ingredients:
1 cup butter (2 cubes)
1/2 cup milk
1 1/2 teaspoons vanilla
2 pounds powdered sugar
3 finely crushed oreos

Directions:
Beat butter in mixer bowl.  Add powdered sugar, milk, and vanilla.  Beat until icing is creamy.  If it is too creamy to pipe on, put it in the fridge to harden it up a bit.  When frosting is ready, pipe onto cupcakes. 
Garnish each cupcake with a half of an Oreo. 

Recipe Source:  Kimmy's Original Oreo cupcake was inspired by this cupcake.  The frosting is my Mom's recipe with Oreos added. 

Linked to:  Sweets for a Saturday

Monday, August 22, 2011

Guest Post: Chris' Lemonade Cupcakes


Meet Christina!  She is the mother of four, wife of one, orchestra teacher of many, toe reader, herbal guru, creative artist, animal lover, gardener and culinary genius.  To top it all off, she is one hot mama!  And I'm lucky enough to have her as my sister-in-law.  Chris is one of those ladies who is at home in her own skin.  She's got depth and understanding beyond her years.  She is a true and loyal friend and person and she is a blast to be with.  She is a breath of fresh air.  I love her to pieces.  So back to the part about her being a culinary genius.  Seriously, this woman creates recipes that are so mouth-watering!  She once made me a pizza, that I kid you not, was 3 1/2 inches high, piled with Mozzarella and Parmesan cheeses, basil leaves, heirloom tomatoes, and other deliciousness, and it was so delectable.  I always look forward to her delicious meals!  So I finally was able to get her to guest post for me.  Hooray!  Presenting Chris' Lemonade Cupcakes.  They are heavenly! 

Chris always makes the food look lovely as well!

Lemonade Cupcakes

Ingredients:
1 cup sifted flour
1 tablespoon baking powder
1/4 cup melted butter
1/2 teaspoon lemon extract
1/2 cup scalded milk
6 egg yolks
1 cup sugar

Directions:
Mix dry flour and baking powder together. Beat eggs until thick and lemon colored. Gradually beat in sugar and lemon extract. Quickly add flour mixture and stir just until mixed. Slowly stir in hot milk. Pour into cupcake liners and bake at 350 for 20 - 25 minutes or until a toothpick inserted comes out clean.

Lemon Curd

Ingredients:
2 eggs
2 egg yolks
1/3 cup sugar
1.3 cup lemon juice
1 tablespoon finely grated lemon peel
1 stick salted butter cut into 1 tablespoon slices

Directions:
Whisk eggs, yolks, sugar, lemon juice and peel into the top of a double broiler. Blend well. set top of double broiler on to bottom with boiling water but make sure that the bottom of the pan does not touch the boiling water. Whisk constantly until thick and 170 degrees for 5 minutes (do not allow to boil). The key to good lemon curd is gentle, constant heat and constant whisking. Remove bowl from over the water and whisk in butter one cube at a time, allowing each curd to melt before adding the next. Cool curd covered in fridge.
Cut a small hole into the top of each cupcake and fill with cooled lemon curd.

Lemon Frosting

Ingredients:
1 cup butter, softened
4 cups confectioner's sugar
1 - 2 tablespoons milk
1/2 teaspoon lemon extract (or to taste)

Directions:
Mix all together with an electric mixer until smooth and creamy. In a pastry bag with a large star or decorating tip swirl frosting onto lemon curd filled cupcakes. Sprinkle with red colored sugar and top with a sliced strawberry.

Wednesday, August 17, 2011

Individual Cheesecakes


Look at these sweet little cakes!  Aren't they perdy?  They taste perdy and are perdy darn easy to make too!  This recipe is one that my mom always made while we were growing up.  In my opinion, it's a perfect amount of cheesecake.  (Okay, so I'll fess up.  Sometimes I eat more than one.)  I topped these little cheesecakes with raspberry because it's in season here, but you could top them with any berry or topping. 


Individual Cheesecakes

Ingredients:
2 8-ounce packages cream cheese, softened
3/4 cup sugar
2 eggs
1 teaspoon vanilla
18-24 vanilla wafers
18-24 cupcake liners
Topping (See below for my homemade raspberry topping)

Directions:
Preheat oven to 350 degrees.  Mix cream cheese and sugar.  Add eggs and vanilla.  Beat until smooth.  Line muffin tins with paper liner and drop a vanilla wafer flat side down into muffin paper.  Cover wafer with cream cheese mixture, 2/3 full.  Bake at 350 degrees for about 10-15 minutes or until firm.  (Watch carefully while baking or the wafer could burn.)  Cool.  Top with whatever topping you'd like.

Homemade Raspberry Topping
1 1/2  cups water
1/2 cup sugar
1 (1.6 oz.) package raspberry flavored gelatin
1 1/2 Tbsp. cornstarch

In medium saucepan, bring water and sugar to a boil. Mix jello with cornstarch and gradually add to boiling mixture. Cook over medium-high heat, stirring constantly for 5 minutes or until mixture is clear and thickened slightly. Remove from heat and cool completely.  Spoon a small amount of topping onto the individual cheesecakes.  Then top with 2-3 raspberries. 

Friday, May 13, 2011

Lion House Cheesecake


Holy smokes people!  This cheesecake is heavenly!  I really, really enjoy a good cheesecake, and this cheesecake is among the best I've ever had.  You wanna hear my theory on why it is so delectable and more desirable than other cheesecakes?  Okay, so it has this sour cream topping layer, and I tell you what, that is the secret ingredient to making it so fabulous.  Cheesecake can get really rich at times, but watch out, because the sour cream layer tones the richness down and makes it purely delicious until the very last bite.  Thus, I eat way bigger pieces than I should multiple times a day.  It's that addicting!  This cheesecake is just so smooth and creamy.  It's perfection in a graham cracker crust.  Oh peeps, you have to have some.  Do y'all want to come over for dessert?

Ingredients
Crust:
1 1/2 cups graham cracker crumbs
3 tablespoons sugar
6 tablespoons butter or margarine

Filling:
3 8-ounce packages softened cream cheese
1 cup sugar
3 eggs
3/4 teaspoon vanilla

Topping:
1 pint sour cream
3 tablespoons sugar
1/2 teaspoon vanilla

Directions:
Crust:  In a medium bowl thoroughly mix the ingredients.  Press firmly into a 10-inch springform pan, lining bottom and sides; set aside.  Make filling.

Filling:  In a large mixer bowl beat cream cheese well.  Add sugar a little at a time; add eggs one at a time; add vanilla.  Combine thoroughly.  Pour into crust; fill to within 1/2 inch of top to allow room for topping.  Bake 55 to 60 minutes at 300 degrees.  While cheesecake is baking, prepare topping.

Topping:  In a small mixer bowl whip sour cream; add sugar gradually, add vanilla.  Pour over baked cheesecake and bake at 300 degrees for 10 minutes.  Allow to cool.  Refrigerate until ready to serve.  Makes 10-12 servings.

Recipe Source:  Lion House Desserts


We topped it with raspberry topping, but you could use any topping or leave it naked. ;)

Wednesday, May 4, 2011

Pina Colada Cupcakes


WOWZER!!!  This is our idea of a rockin' Cinco de Mayo dessert.  These cupcakes were so moist, soft, and loaded with flavor and were really easy to make too.  They were like heaven in a paper liner.  So yummy!  I think I love them.  Yep, I'm pretty sure I do. 

Pina Colada Cupcakes

Ingredients:
1 box Betty Crocker® SuperMoist® yellow cake mix
1/3 cup vegetable oil
1/4 cup water
1 teaspoon rum extract
1 can (8 oz) crushed pineapple in juice, undrained
3 eggs
1 teaspoon coconut extract
1 teaspoon rum extract
1 container (12 oz) Betty Crocker® Whipped vanilla frosting
3/4 cup shredded coconut, toasted

Directions:
1.  Heat oven to 375°F (350°F for dark or nonstick pan). Place paper baking cup in each of 24 regular-size muffin cups. In large bowl, beat cake mix, oil, water, 1 teaspoon rum extract, the pineapple and eggs with electric mixer on low speed 30 seconds. Beat on medium speed 2 minutes, scraping bowl occasionally. Divide batter evenly among muffin cups.

2.  Bake 14 to 19 minutes or until toothpick inserted in center comes out clean. Cool 10 minutes; remove from pan to cooling rack. Cool completely, about 30 minutes.

3.  Stir coconut extract and 1 teaspoon rum extract into frosting. Spread frosting on cupcakes. Dip tops of frosted cupcakes in coconut. Store loosely covered at room temperature.

Recipe Source: Betty Crocker

Check out Amanda's recipe for a Pina Colada Cheesecake (Yes, those three words are combined!) at her fabulous blog Eating In Winnipeg!  It looks absolutely scrumptious!

Linked to:  Friday Potluck, It's a Keeper Thursday, Sweets for a Saturday, Sweet Indulgences Sunday, Muffin Monday

Wednesday, April 27, 2011

Guest Post: Laura's Rainbow Cake

I am so excited to introduce you to Laura!  Isn't she gorgeous?  I met Laura when we lived in Kentucky.  To know Laura is to love Laura.  She's one of those people who makes you feel like a million bucks because she is so genuine, kind, and all sorts of fabulous.  Plus, she is super talented.  You've got to check out this cake she made.  Here she is...


My name is Laura, and I am flattered and excited that Kim invited me to be a guest on her blog! I'm a stay at home mom to two small kiddos--an adorable and very busy 21 month old son named Dominic, and a beautiful, sweet daughter named Bethany, who just turned 4. This birthday cake was for her special day. The last several months, she has been obsessed with rainbows. She loves to watch the show on PBS called, "The Cat in the Hat Knows a lot about that!" and they have an episode all about rainbows with a cute little song listing all 7 colors. So, this year for her birthday, it was all about rainbows! We had rainbow streamers, balloons that were all of the colors of the rainbow, rainbow colored fruit (watermelon, cantaloupe, pineapple, green grapes, blueberries, and purple grapes), and she even wore a rainbow dress for her birthday party. A bit over the top? Nah! She loved everything about it, and it sure was fun! What was my favorite rainbow thing? The cake of course! I absolutely love making fun and sometimes time consuming cakes for my kids' birthdays. Seeing their reaction to the final product is the best! For the rainbow theme, I found several websites who had ideas on how to bake a rainbow cake, but the blog "One Charming Party" had an idea I liked best.


Here's how I did it:

8 Layer Rainbow Cake:

What you will need:
2 boxes of your favorite brand of white cake
8 colors of food coloring (I use the Wilton brand icing colors. In my opinion, they are the truest & brightest colors)
8 bowls
8" or 9" round pan(s)

Preheat the oven to 350. Mix the two cake mixes according to the directions on the box. Divide the batter into 8 different bowls. I used an overflowing 2/3 cup for each color to make them evenly divided. Add the food coloring to each bowl. With the Wilton icing colors, I used Red-Red, Orange, Lemon Yellow, Leaf green, Royal Blue, Delphinium Blue (this made a great indigo), Violet, and Pink. Grease and flour your pan(s) and line the bottom with wax paper to ensure they will come out of the pan after baking. You will obviously take turns with your pans--unless you happen to have 8 pans! Cook each cake at 350 for about 15 minutes or until a toothpick poked in the center comes out clean.  Once the cakes are cooled completely, individually wrap each color and freeze them. This will make it easier to assemble and frost each layer. Once they are all frozen, you can begin to assemble your cake, frosting each individual layer, and then frost the whole cake when all the layers have been frosted and stacked. This makes a fabulously tall cake, but the really fabulous part is when you cut into it! All of the kids at the party were so surprised by the rainbow colors inside of the cake!

The birthday girl with her rainbow cake.

Tuesday, April 12, 2011

Layered Brownie Ice Cream Cake


Ice cream and brownies and cream!  Oh my!!!  This was the hubs birthday cake this year and I must say, it was a winner.  We DEVOURED that baby.  My hubs requested 3 of his favorites things to be in this cake:  brownies, oreos, and ice cream.  This is what we came up with:  An Oreo cookie crumb bottom, a smooth cookies and cream ice cream layer, the ultimate brownie layer, topped by decadent Tillamook Mudslide Ice Cream, with Cool Whip and Oreo to finish her off.  I think it is one of our all time favorite cakes now.  Too bad my birthday isn't 'til November....guess we'll just have to find another reason to make this cake soon.  So the cake is very simple to prepare.  Just takes a little planning with time because you have to do a few things ahead of time and freeze the cake before serving so check out the timing. 

Layered Brownie Ice Cream Cake

Ingredients:
15 Oreo cookies
1-2 tablespoons milk
8-9 ice cream sandwiches
1 pint chocolate ice cream (I used chocolate with a chocolate fudge swirl - Tillamook Mudslide.)
1 pint cookies and cream ice cream
1 brownie mix (plus ingredients to make the brownies)
1 container (8 ounces) Cool Whip

Directions:
1.  Make brownies according to directions on box. Prepare two 8-inch cake pans by putting wax paper in it and spraying it with cooking spray. Pour half the brownie mix into each of the pans. Cook for 25 minutes or until toothpick comes out clean at the degree specified on the brownie mix box. Cool. Cover with plastic wrap and let set overnight or at least a few hours. You only need one pan of the brownies so feel free to eat the other pan while you're making the ice cream cake. ; )
2.  Coat bottom and side of a 9-inch round springform pan with nonstick cooking spray. Line side with waxed paper, using spray to help adhere to pan. Trim paper to height of pan.

3. Finely crush 12 of the Oreos in a food processor. Add milk; pulse just until mixture holds together. Set aside.

4.  Unwrap the ice cream sandwiches.  Cut the ice cream sandwiches in half lengthwise.  Then cut sandwiches in half crosswise (these will be the cake's edge).  Working quickly, stack cut strips on end against side of prepared pan to form the stand up edge of the cake. Spoon cookie crumbs into center of pan; press firmly over bottom. Freeze 1 hour.  Click here for a tutorial with pictures on how to do step 4. 

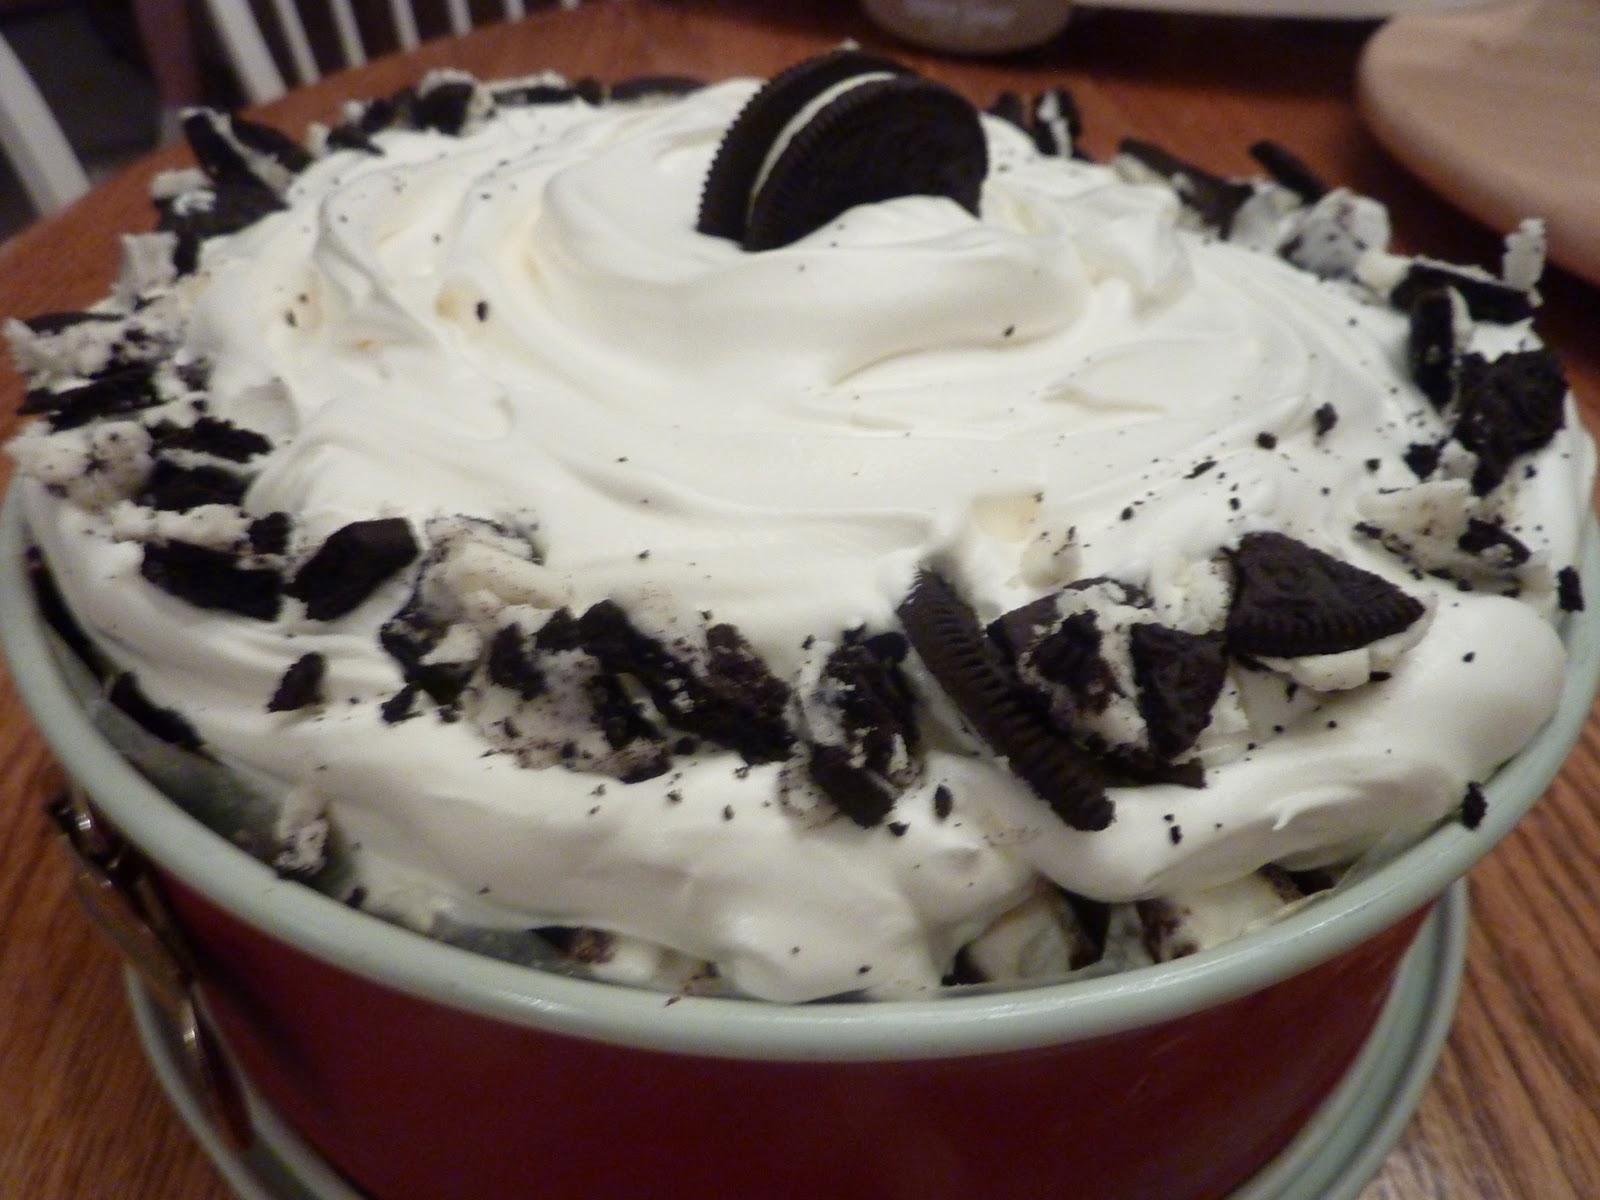
5.  Remove the ice cream from freezer; let soften for 15 minutes at room temperature. Remove the springform pan with the edges and crumb bottom. Transfer the cookies and cream ice cream into the pan and press down ice cream until level and smooth. For the brownie layer, cut off some of the edge to make it fit into the center of the cake.  When it fits in, fill in any holes with the extra edge pieces.  Press down on any brownie pieces that aren't smooth and even. Next, place the chocolate ice cream on top of the brownie layer and press down until smooth and level. Add thawed Cool Whip, swirling decoratively. Break up remaining 3 sandwich cookies and use to decorate cake. Return to freezer; freeze overnight or at least 5 hours).

6.  To serve, remove side of pan, then waxed paper. Let cake stand at room temperature for 5-10 minutes for easier cutting. Slice into wedges and serve.

Inspired by:  Layered Ice Cream Cake

Linked to: Tuesday Night Supper Club, What's Cooking Wednesday, Show and Tell at Blue Cricket Design, Your Whims Wednesday, Friday Favorites, Sweet Tooth Friday, Sweets for a Saturday, Foodie Friday

Thursday, April 7, 2011

Tee Time Cupcakes


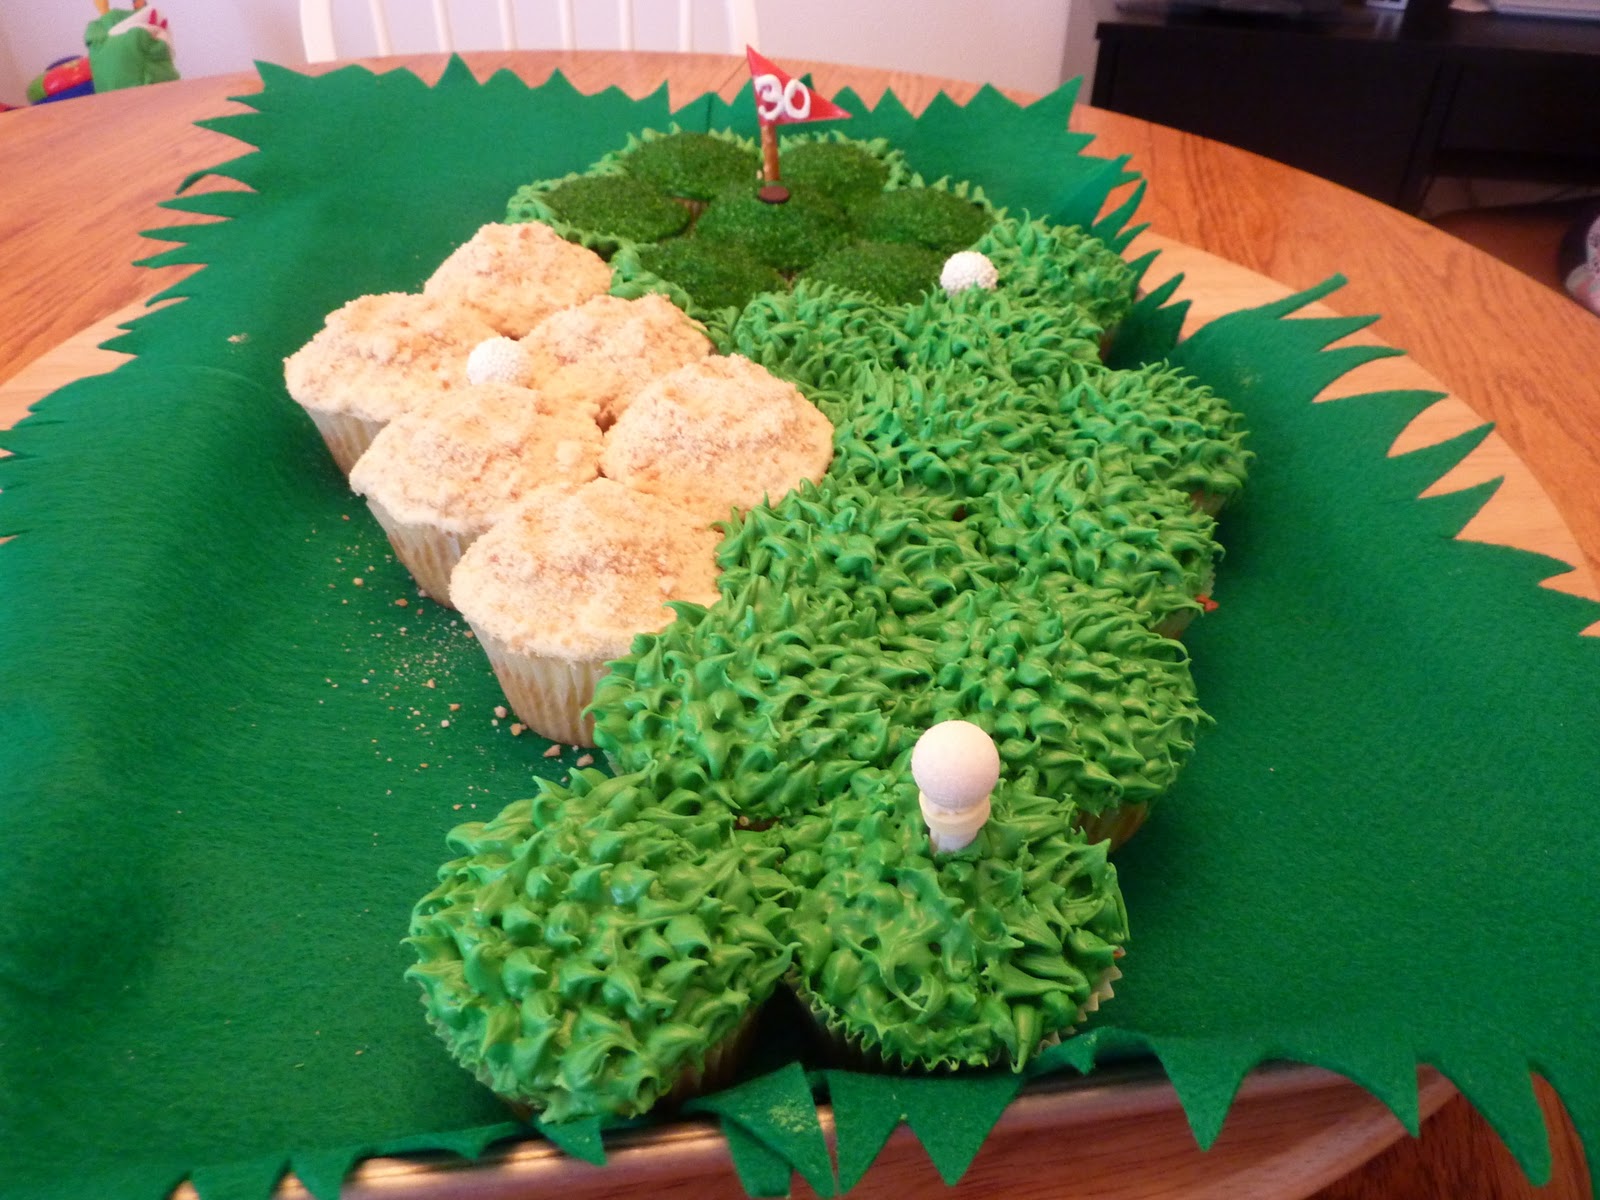
Do you want to impress without too much fuss?  This is definitely the cake or rather cupcakes for that.  This cake is pretty simple and is perfect for the Masters golf tournament coming up this Sunday.  I actually made this as a surprise for the hubs celebrating his 30th birthday and brought it to school for him and his co-residents.  (He wants this ice cream cake for his actual birthday, but I had to surprise him with SOMETHING for his 30th.)  There are five things you need to know about this:  1.  You don't need any cake decorating tips, just ziplock bags.  2.  You don't need to have any cake decorating skills.  Seriously!  3.  The biggest booger on this cake was sticking the white non-pareils on the gumballs.  I didn't even bother sticking the white-nonpareils to the gumball on the tee.  I just left it plain.  So if you don't want to bother with it, just skip that part of the directions in step four (and don't buy the white non-pareils).  5.  People will ooh and aah and think you are amazing.... : )  Just don't let them in on the secret of how easy it is. 

Tee Time Cupcakes

What you need:
24 vanilla cupcakes, 6 baked in white paper liners and 18 baked in green paper liners
1/2 cup ground vanilla wafers
2 cans (16 ounces each) vanilla frosting
Green food coloring
1/2 cup green decorating sugar or 1 (2.25 oz.) bottle of the green decorating sugar
1 yellow flat candy (Smarties or generic)
1 yellow licorice pastel (I used a white Good & Plenty.)
1 tablespoon white nonpareils
3 white gum balls
1 teaspoon light corn syrup
1 2-inch piece strawberry fruit leather (Fruit Roll-ups or Fruit by the Foot works best.)
1 thin pretzel stick
1 chocolate chip
Green felt (if you want to place the cupcakes on a green surface)

Directions:
1.  Place the cookie crumbs in a shallow bowl.  Spread the tops of the 6 cupcakes in white paper liners with vanilla frosting and smooth.  Roll the tops in the crumbs to cover.  Spoon 2 tablespoons vanilla frosting into a small ziplock bag, press out the excess air, and seal.  (You'll use this later.)  Tint the remaining frosting green with the food coloring. 

2.  Place the green decorating sugar in a small shallow bowl.  Spread the tops of 7 of the remaining cupcakes with green frosting and smooth.  Roll the tops in the sugar to cover.  Spread a thin layer of green frosting over the remaining 11 cupcakes.  Spoon the remaining green frosting into two ziplock bags, press out the excess air, and seal. 

3.  Arrange the cupcakes on a serving platter, grouping the crumb-topped cupcakes and the sugar-topped cupcakes together.  (See photo below.)  My cupcakes fit perfectly in an 11x14 inch cookie sheet that was covered with green felt. 


Add some extra wafer crumbs to the top of the sand trap cupcakes to make it look more sandy.  Snip a small (1/8-inch) corner from the bags with green frosting.  Pipe grass over the green-frosted cupcakes and around the perimeter of the sugar-topped cupcakes.  To create the grass, touch the tip of the bag to the surface, squeeze, and anchor the frosting.  Release the pressure before lifting.  Pull away to make a peak.  Don't worry if a few pieces of grass don't turn out.  At the end, you'll never notice. 

4.  For the tee, snip a small (1/8-inch) corner from the bag with the vanilla frosting and pipe a dot on one end of the yellow flat candy.  Attach the licorice pastel and insert into 1 of the cupcakes at the tee position.  Place the white nonpareils in a small shallow bowl.  Roll the gum balls in the corn syrup to coat and then roll them in the nonpareils to coat.  Pipe a dot of frosting on top of the tee and place 1 ball on top.  Place the others on other cupcakes. 

(I hope this pic gives you a better view of the tee.)

5.  For the flag, fold the fruit leather in half around one end of the pretzel stick.  Using clean scissors, cut into a triangular flag shape.  Pipe the number you want on the flag with the vanilla frosting.  Insert the pretzel stick in the center of the sugar-topped cupcake grouping.  For the hole, add the chocolate chip at the base of the pretzel, pointed end down. 

Recipe Source:  What's New, Cupcake? by Karen Tack and Alan Richardson

Linked to:  Full Plate Thursday, Tuesday's Tasty Tidbits, Sweet Tooth Friday, Saturday Swap, Sweets for a Saturday

Friday, January 28, 2011

Texas Sheet Cake


So if you've never had Texas Sheet Cake before it is to die for!  It is a cross between chocolate cake and brownies to me.  I like both, but Texas Sheet Cake, I love.  They appear on the plate like any normal frosted brownie.  In fact, you may even think it looks (should I saw the words) store bought.  But once you put one of these delectable babies in your mouth, you'll just fall into a deep chocolate coma of delight.  You will want to invite people over because this recipe makes a whole cookie sheet full and trust me, you will be tempted to eat one, and then another, and before you know it, you wonder who snuck into your house and ate your delicious dessert.  I also posted this recipe at Sweets for a Saturday hosted by Sweet as Sugar Cookies.  (There are so many delicious looking desserts on there.)

Texas Sheet Cake

3/4 pound butter or margarine (3 cubes)   Can you already tell why these are so delicious?  ; )
1 cup water
1/4 cup cocoa

Put the above in pan and bring to a boil.

Add:
2 cups flour
2 cups sugar

Mix them together first, and then add to above.

Add:
1/2 cup buttermilk
2 eggs
1 tsp. vanilla
1 tsp. soda

Mix well and bake in a 17 1/4 x 11 1/2 x 1 inch cookie sheet at 400 degrees for 15-20 minutes (or until toothpick comes out clean).

Near the end of the baking time, make the icing and put on brownies as soon as they come out of the oven. 

Icing:
1/4 pound (1 cube) butter or margarine
1/3 cup milk
1/4 cup cocoa

Bring barely to a boil.  Take off the stove.  DO NOT OVERCOOK!

Add:
1 pound bag of powdered sugar
1/2 teaspoon vanilla
1 cup chopped nuts (optional)

Frost brownies as soon as they come out of the oven.  Put the brownies in the refrigerator to cool.

Recipe Source:  My Momma!

Wednesday, January 5, 2011

Layered Ice Cream Cake


So my baby girl turned 3 yesterday!   I can't believe it!  She's 3 already.  I remember puking my guts up with her all 9 months.  Yes, that's right, all nine.  She was worth it though and now she's 3!  So we definitely had to have a special cake this year.  Last year, we did a Barbie cake and caterpillar cake.  The year before was a rubber ducky cake.  This year was an ice cream cake with hamburger cupcakes and fries.  The ice cream cake turned out sooooo good.  Three different flavors of ice cream with ice cream sandwiches around the edges on top of an Oreo crust...HELLO...how can it not be good.  We also made these hamburger cupcakes and fries which are probably one of the cutest things I have ever laid my eyes on.  It's so cute, you almost can't eat it...ALMOST...

Here's the little cutie with her ice cream cake. Isn't she a doll?

Layered Ice Cream Cake

Ingredients:
15 Oreo cookies
1 tablespoon milk
8-9 ice cream sandwiches
1 pint chocolate chunk ice cream
1 pint cookies and cream ice cream
1 pint strawberry ice cream
1 container (8 ounces) Cool Whip

Directions:
1.  Coat bottom and side of a 9-inch round springform pan with nonstick cooking spray.  Line side with waxed paper, using spray to help adhere to pan.  Trim paper to height of pan.

2. Finely crush 12 of the Oreos in a food processor.  Add milk; pulse just until mixture holds together.  Set aside.

3.  Unwrap the ice cream sandwiches.


Cut the ice cream sandwiches in half lengthwise.


Then cut sandwiches in half crosswise (these will be the cake's edge).


Working quickly, stack cut strips on end against side of prepared pan to form the stand up edge of the cake. FYI - these little babies melt fast...really fast. 

Spoon cookie crumbs into center of pan; press firmly over bottom.  Freeze 1 hour. 

4.  Remove all 3 flavors of ice cream from freezer; let soften for 15 minutes at room temperature.  Remove the pan with the edges and crumb bottom.  Transfer the chocolate chunk ice cream into the pan and press down ice cream until level and smooth.  Repeat with the cookies and cream ice cream and the strawberry ice cream.  Make sure all layers are level.  Add thawed Cool Whip, swirling decoratively.  Break up remaining 3 sandwich cookies and use to decorate cake.  Return to freezer; freeze overnight.


5.  To serve, remove side of pan, then waxed paper.  Let cake stand at room temperature for 5-10 minutes for easier cutting.  Slice into wedges and serve.

Recipe Source:  adapted from Family Circle Magazine September 2009


Here's the hamburger cupcakes and fries we made. Oh my cuteness! Go to Bakerella to make these. She has the best directions on how to do it!  She even gives you a templates for the fry holder, tissue paper, and the little boxes you put them in. 

Monday, August 9, 2010

Chris' Outrageous Chocolate Cake from the Cheesecake Factory

All the layers of this heaven sent cake before frosting the edges.

Mmmmmm!!!!!

The frosted edition.

After digging in!

This is a little piece of heaven on earth for me! I love this cake from Cheesecake Factory. Maybe we should call it a big piece of heaven on earth because the cake is huge. It has eight layers. Yes, eight delicious layers. It's actually 4 layers repeated twice. What are these delicious layers you might ask? Here goes: Moist chocolate cake, creamy chocolate chip coconut cheesecake, chewy brownie, and toasted coconut pecan frosting. Oh my mouth is watering! So I searched and searched online for a copycat recipe for this dessert. I couldn't find one much to my dismay! That's when I decided to create my own. I was so happy with how it turned out! Now I don't have to pay $7.50 when I want a piece of this baby. The cake itself is easy to make. It just takes time because you have to freeze and refrigerate parts of it in order to assemble it. It is so worth it though! The cake is very similar to the Cheesecake Factory's. The big difference is that I put buttercream frosting around the edges of mine. The Cheesecake Factory has a different frosting around the outside. The buttercream frosting was fabulous.

Kimmy's Version of Chris' Outrageous Chocolate Cake from the Cheesecake Factory

Ingredients:
Chocolate Cake Layer:
1 Box Mix of German Chocolate Cake
(Plus ingredients to make cake)

Brownie Layer:
1 Brownie Mix
(Plus ingredients to make brownies)

Chocolate Chip Coconut Cheesecake Layer:
2 8 oz. packages cream cheese
2 eggs
1/2 cup granulated sugar
1/2 cup chocolate chips
1/2 cup coconut
1/2 tsp. vanilla

Coconut Pecan Frosting:
1 cup granulated sugar
1 cup evaporated milk
1/2 cup butter, cubed
3 egg yolks, lightly beaten
1 teaspoon vanilla
2 1/2 cups flaked coconut
1 1/2 cups chopped pecans

Chocolate Buttercream Frosting:
1 lb. powdered sugar
1/3 cup cocoa powder
1 cube butter or margarine
1 teaspoon vanilla
1/4 cup milk (adjust to get to the right consistency)

Directions:
1. The Cake Layer
Make cake according to directions on box. Prepare 2 9 inch cake pans by putting wax paper in it and spraying it with cooking spray. Pour half the cake mix into each of the pans. Cook according to box mix for the 9 inch pans. Check with toothpick to make sure they're done. Cool. Cover with plastic wrap and freeze overnight. (You can wrap them in the pans or remove them from the pans and wrap them.)

2. The Brownie Layer
Make brownies according to directions on box. Prepare 2 9 inch cake pans by putting wax paper in it and spraying it with cooking spray. Pour half the brownie mix into each of the pans. Cook for 25 minutes or until toothpick comes out clean at the degree specified on the brownie mix box. Cool. Cover with plastic wrap and freeze overnight. (You can wrap them in the pans or remove them from the pans and wrap them.)

3. The Cheesecake Layer
Preheat oven to 350. Mix together softened cream cheese, eggs, and sugar. Then add the coconut, chocolate chips, and vanilla. Prepare 2 9 inch springform pans by putting wax paper in it and spraying it with cooking spray. Pour half the cheesecake mix into each of the pans. Cook for 15 to 20 minutes or until middle is set. Remove from oven and let cool. Cover and refrigerate overnight.

4. The Coconut Pecan Frosting Layer
In a heavy saucepan, combine the sugar, milk, butter and egg yolks. Cook and stir over medium heat until thickened. (It should be thick enough to coat the back of a metal spoon.) Remove from heat. Stir in vanilla; fold in coconut and pecans. Cool until frosting reaches spreading consistency.

5. The Buttercream Frosting
Mix all ingredients until light and fluffy. Not too long or it will get too gooey.

Putting it all together:
I froze the cake and brownie layers overnight. The cheesecake was refrigerated overnight. The next day I made both the frostings. I leveled the chocolate cake with a cake leveler. If you don't have a leveler, just eyeball it. The first layer of the cake was the chocolate cake. Next the cheesecake. Then brownie. Then coconut pecan frosting. Repeat the layers: chocolate cake, cheesecake, brownie, coconut pecan frosting. Use the buttercream frosting around the sides. I left the cake out for 1/2 a day so the layers could settle together. Yummy, yummy, yummy in my tummy!

Linked to:  A Themed Baker's Sunday

Recipe Source:  This is my personal creation!

Wednesday, June 9, 2010

Cookie Stuffed Cupcakes

(The inside of the cookie stuffed cupcake!)

I found this delectable dessert on Picky Palate. We loved this dessert. I changed up just a few things from the original recipe mainly by filling it with different cookie dough. Seriously, you will want to eat them all up!

Cupcakes:
1 box white cake mix
1 small box instant chocolate pudding mix
4 eggs
1/2 cup water
1/2 cup vegetable oil
1/2 cup sour cream
Favorite Cookie Dough (I used a chocolate macadamia nut cookie dough. It was fabulous!)

Frosting:
8 oz. softened cream cheese
1 stick softened butter
3 cups powdered sugar

1. Preheat oven to 350 degrees F. Place cake mix, pudding mix, eggs, water, oil and sour cream into a stand or electric mixer. Beat on medium speed for close to 2 minutes or until well combined. Scoop into 24 paper lined cupcake cups just over 1/2 full. Next, press 1 Tablespoon prepared cookie dough into the center of each cupcake batter. Bake for 18-24 minutes or until toothpick comes out mostly clean from center. Let cool completely.

2. Place cream cheese and butter into mixer, beat until well combined. Slowly add in powdered sugar until good frosting consistency then spread with cream cheese frosting.

Thursday, May 6, 2010

German Chocolate Cheesecake


This is heaven on a plate. I love German Chocolate Cake and Cheesecake. Combine the two and you have got something I'm going to savor for life! This is one of my favorite desserts now! I found the recipe when I was pregnant and have saved it for when I wasn't constantly nauseous! I'm so glad I did because it was scrumptious! The recipe came from Mommy's Kitchen.

German Chocolate Cheesecake

CAKE:
1 package german chocolate cake mix

CREAM CHEESE FILLING:
2 packages (8 ounces each) cream cheese, softened
1-1/2 cups granulated sugar
4 eggs, lightly beaten

FROSTING:
1 cup granulated sugar
1 cup evaporated milk
1/2 cup butter, cubed (not margarine)
3 egg yolks, lightly beaten
1 teaspoon vanilla extract
2-1/2 cups flaked coconut
1-1/2 cup chopped pecans

DIRECTIONS:
Prepare cake batter according to package directions; set aside. In a small bowl, beat cream cheese and sugar until smooth. Add eggs; beat on low speed just until combined. Pour half of the cake batter into a greased 13-in. x 9-in. baking dish. Gently pour cream cheese mixture over batter. Gently spoon remaining batter over top; spread to edge of pan. Bake at 325° for 70-75 minutes or until a toothpick inserted near the center comes out clean. Cool on a wire rack for 1 hour. For frosting, in a heavy saucepan, combine the sugar, milk, butter and egg yolks Cook and stir over medium-low heat until thickened and a thermometer reads 160° or is thick enough to coat the back of a metal spoon. Remove from the heat. Stir in vanilla; fold in coconut and pecans. Cool until frosting reaches spreading consistency. Frost cooled cake. Refrigerate leftovers. Yield: 16 servings

Thursday, November 12, 2009

Easy Chocolate Dessert


Not only is this dessert easy, but it is so delicious! I made it for a block party and everyone loved it!
*
1 chocolate cake mix
1 large (or two small) packages instant chocolate pudding
12-16 ounce container of Cool Whip
4 Skor or Heath bars

Bake 1 CHOCOLATE CAKE MIX according to directions on package in a 9x13 inch pan. Cool the cake. Cut the cake in half. Crumble half of the cake into a large (preferrably glass) bowl.

Prepare 1 LARGE OR 2 SMALL PACKAGES INSTANT CHOCOLATE PUDDING according to directions on package. Put half of the pudding in bowl on top of the broken up cake.

Place 1/2 of a 12-16 ounce container of COOL WHIP on top of the pudding in the bowl.

Cut up 2 SKOR OR HEATH BARs and put over Cool Whip.

Layer other half of cake, the rest of pudding, the rest of Cool Whip and 2 more Heath or Skor bar over the other ingredients already in bowl. Chill overnight before serving. DELICIOUS!

Tuesday, July 21, 2009

Cinnabun Cake


This is so delicious! I think this recipe came from Picky Palate. It is way easier than making cinnamon rolls and definitely satifies that cinnamon roll craving. We loved it!

Cinnabun Cake

3 cups flour
¼ teaspoon salt
1 cup sugar
4 teaspoons baking powder
1 ½ cups milk
2 eggs
2 teaspoons vanilla
4 T. butter, melted

2 sticks butter, softened
1 cup brown sugar
2 T. flour
1 T. cinnamon
2/3 cups nuts, optional

2 cups powdered sugar
5 T. milk
1 teaspoon vanilla

In an electric or stand mixer mix the flour, salt, sugar, baking powder, milk, eggs and vanilla. Once combined well, slowly stir in melted butter. Pour batter into a greased 9 x 13 inch baking pan.

In a large bowl, mix the 2 sticks of softened butter, brown sugar, flour, cinnamon and nuts until well combined. Drop evenly over cake batter by the tablespoonfuls and use a knife to marble/swirl through the cake.Bake at 350 for 25-30 minutes or until toothpick comes out nearly clean from center.

Place powdered sugar, milk and vanilla in a large bowl. Whisk until smooth. Drizzle over warm cake. Serve warm or at room temperature

Friday, July 17, 2009

Chocolate Chip Cake Bar

I got this recipe from Everyone's Gotta Eat. These are so easy to make and are scrumptious! They don't last long. I couldn't even get a picture without them literally being dug in to!


Chocolate Chip Cake Bar

1 package yellow or white cake mix (I prefer white)
2 eggs
1/4 Cup packed brown sugar
1/4 Cup butter or margarine, melted
1/4 Cup water
2 1/4 cups semisweet chocolate chips, divided (or whatever kind of chips you want. I put in about 1 cup of semisweet chocolate chips and about ¾ cup of butterscotch chips. It turned out so delicious. I reserved ¼ cup semisweets and ¼ cup butterscotch to put on top.)
1/2 Cup chopped pecans or walnuts (optional – I left them out)


-In a mixing bowl, combine the first five ingredients. Beat on medium speed for 2 minutes.
-Stir in 1 3/4 cups of chocolate chips and nuts.
-Spread in a greased 13-in. x 9-in. x 2-in. baking pan.
-Bake at 375° for 20-25 minutes or until lightly browned and a toothpick inserted near the center comes out clean.
- Put the additional chips on top of the cooked chocolate chip cake bar.

Sunday, May 10, 2009

Molten Lava Chocolate Cupcakes


I got this recipe from "Cupcakes by the Cake Doctor". It was super delicious and just like I remembered.

This is the recipe for the inside molten lava delight.

Basic Chocolate Ganache (chilled at least one hour)
3/4 cup heavy whipping cream
8 ounces (1 1/3 cup) semisweet chocolate chips
1 teaspoon pure vanilla extract

1. Place the cream in a small saucepan over medium heat. Bring it to a boil, stirring. Place the chocolate chips in a glass bowl. Remove the cream from heat and pour over the chocolate chips. Stir with a wooden spoon until the chocolate has melted. Stir in the vanilla. Cover with plastic wrap and let it chill in the fridge for at least an hour.

This is the recipe for the cupcake.

1 package plain devil's food cake mix
1 cup water
1/2 cup vegetable oil
3 large eggs
1 teaspoon pure vanilla extract
1/2 teaspoon ground cinnamon
1/4 cup powdered sugar, for dusting (optional)

1. Preheat oven to 400. Coat cupcake tins with cooking spray.
2. Place the cake mix, water, oil, eggs, vanilla, and cinnamon in a large mixing bowl. Mix until all ingredients are well combined.
3. Spoon batter into the prepared cup filling it 3/4 of the way full. Drop a heaping teaspoon of ganache onto the top and center of each cup.
4. Bake the cupcakes for 12-14 minutes or until the cake bakes up around the ganache and the cupcakes spring back when lightly pressed with your finger.
5. Remove the cupcakes from the oven and let them cool for 1 minute. Run a butterknife around the edges of the cupcake cups, lift the cupcakes up from the bottom of the cups using the end of the knife, and pick them out of the cups carefully with your fingertips.
6. Dust with powdered sugar and serve warm with vanilla ice cream.
This is what's inside one of these bad boys. Pure deliciousness!!! You can heat it in the microwave if you want the ganache even warmer. These are so good!!!

Just so you are not alarmed. They have a hole in the middle where the ganache sinks down. You can cover it when serving with the powdered sugar like I showed in the first picture or throw a scoop of ice cream on top to cover it. We just ate these as a family and so they were fine just eating them as is.

Tuesday, March 3, 2009

Cheesecake Factory Pumpkin Cheesecake

I got this recipe from my friend Krista's blog. She's got tons of delicious recipes. I am a huge fan of cheesecake and love to try new ones. This one is really tasty! (Sorry, I didn't take a picture of this one. There is one on Krista's blog though.)

Crust:
1 1/2 cups graham crumbs
5 Tbsp. butter, melted
1 Tbsp. sugar

Filling:3- 8oz.pkgs. cream cheese, softened
1 cup sugar
1 tsp. vanilla
1 cup canned pumpkin
3 eggs
1/2 tsp. cinnamon
1/4 tsp. nutmeg
1/4 tsp. allspice

Whipped Cream

Mix crust ingredients together, just till coated and crumbly. Press onto the bottom and 2/3 up the sides of an 8" springform pan. Bake for 5 min. at 350. Set aside.

Combine cheese, sugar and vanilla in large bowl, mix until smooth with an electric mixer. add pumpkin eggs, and spices, beat till smooth and creamy. Pour into the crust. Bake for 60-70 min. or till the top turns a bit darker. Remove from oven and allow to come to room temperature, then refrigerate. After it has thoroughly chilled, remove the pan sides and cut. Serve with whipped cream.

LinkWithin

Related Posts with Thumbnails